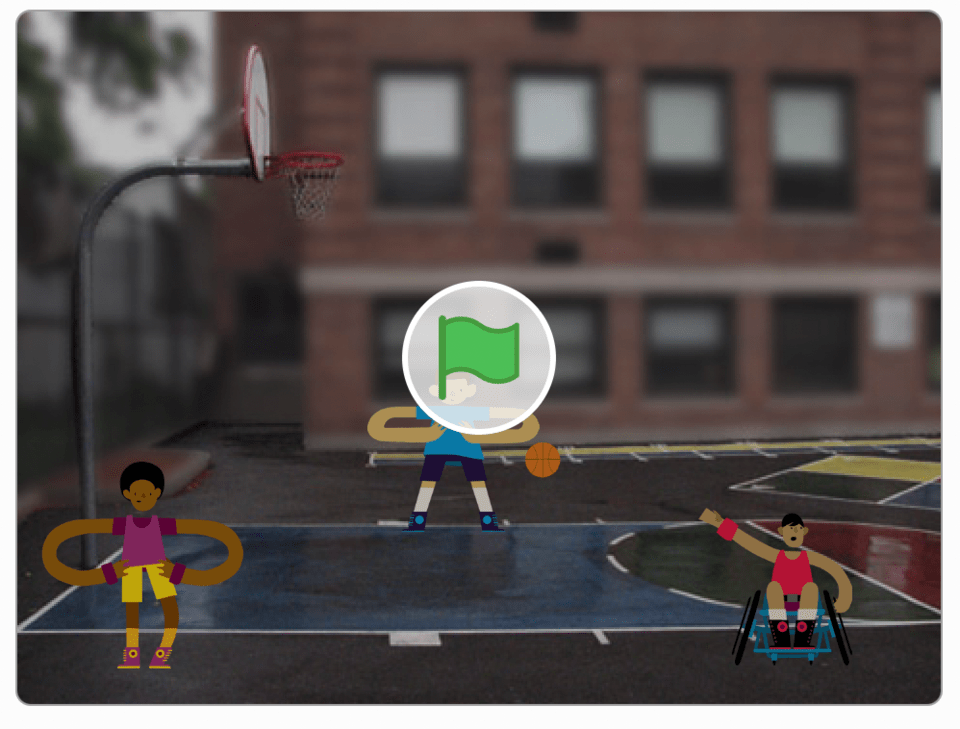
Let’s make a basketball game on Scratch! Sports is a fantastic topic for Scratch coding. In this tutorial, we will show you how to create a fun basketball game. The key to this short game is coordination and timing. Every sprite has at least one task and the sequence of when and how these tasks are performed is important. Most techniques used in this game are applicable to many other sports related Scratch projects.
We’ll guide you and your child through the steps, provide tips to help with any troubles you might encounter, and review the key programming concepts you’ll have put into practice. Plus, we’ll share some advanced tips and enhancements you can try to make your game super customized and fun.
If you enjoy creating games in Scratch, join our online, award-winning Scratch coding for kids classes and our game building class for kids led live by expert instructors and designed by professionals from Google, Stanford, and MIT. There’s no risk in trying with our free intro session!
Check out upcoming free computer science events for kids & teens led by tech experts: past events have featured guests from Pixar, NASA, Intel, and more.
Make a Basketball Game on Scratch in Simple Steps
Scratch for kids is great for making games. It can be used by programmers of all ages and skill levels. In this article, we’ll walk you through the steps making your own fun animation of an exciting basketball game. For the most part, our “wait () seconds” block will take care of the timing part for custom switching and ball passing. The “go to x and y” block should take care of the ball’s whereabouts, and different “switch custom to” block will take care of the overall appearance, gesture, and body language of our humans sprites. And just like in a real basketball game, strategizing the next move is crucial. Hence “broadcast message” and “when I receive message” blocks will help determine whose turn it is to perform.
Step 1: Select sprites and resize
Select the three basketball player sprites (Andie, Jamal, and Dorian) plus the basketball sprite and manually set the sizes to 70% for the three players and 40% for the ball.
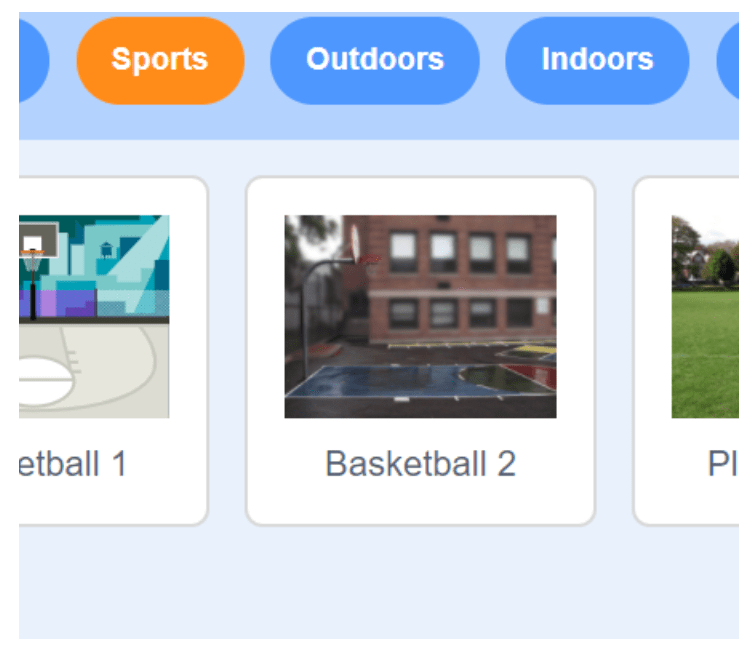
Step 2: Choose a backdrop
Click on Choose a backdrop in the bottom right corner of your screen. You can either search for the backdrop in the search box or click on the sports category to choose the Basketball 2 backdrop.
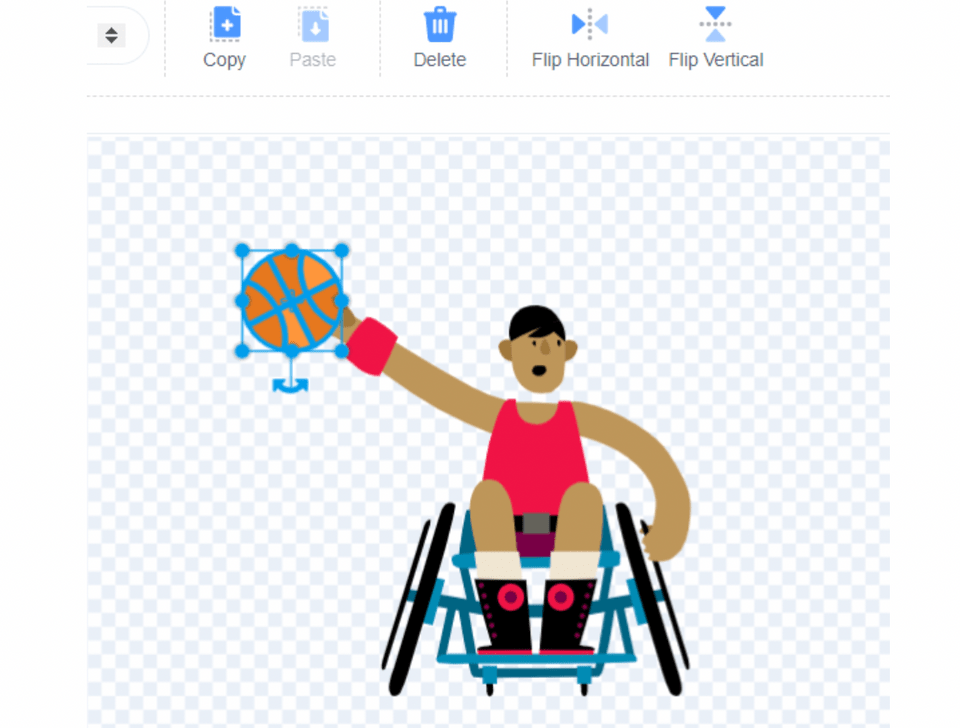
Step 3: Customize the sprites – delete ball
In the costume tab for each player sprite, remove the ball from their costumes. We will use our ball sprite instead. To remove the ball simply click on it and press the backspace key or click on the trash bin icon to delete it. You can always click the undo arrow if you make a mistake!
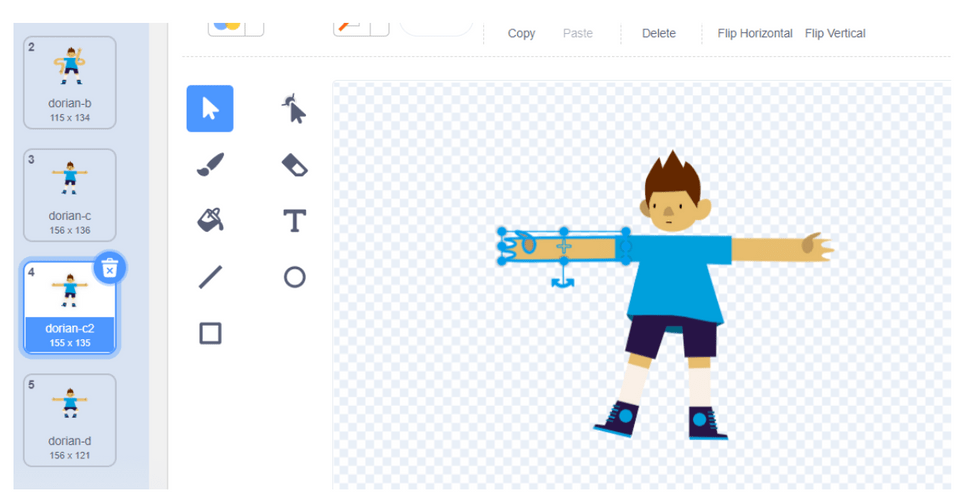
Step 4: Customize sprites – duplicate and edit
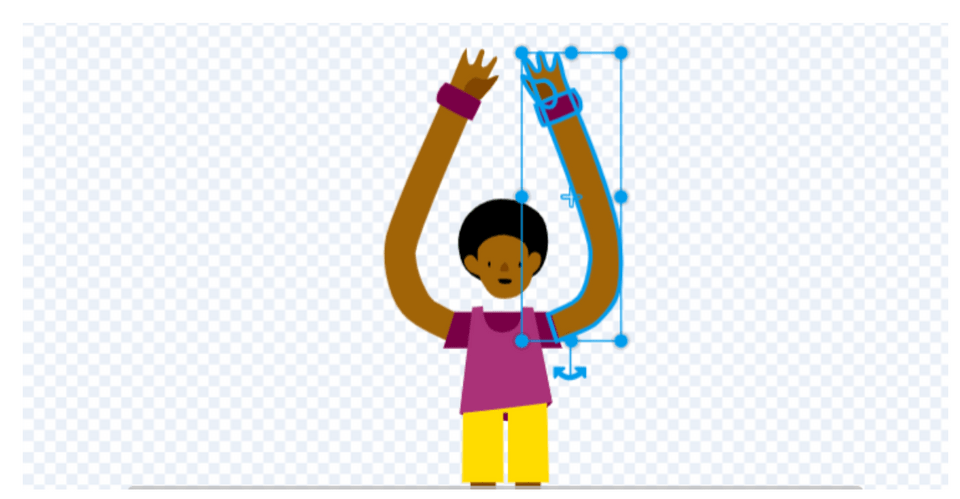
Duplicate Dorian’s costume by selecting dorian-c from the left menu by right clicking and selecting “duplicate” from the options. Then move his arms up so that we can later use that particular costume to animate his excitement once the team scores. To rotate the arm, click on it, and look for the curved double arrow below the selection box.
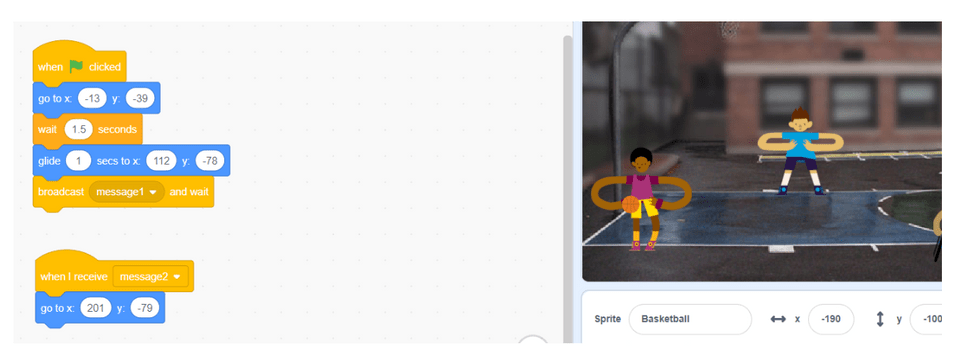
Step 5: Ball sprite’s initial location
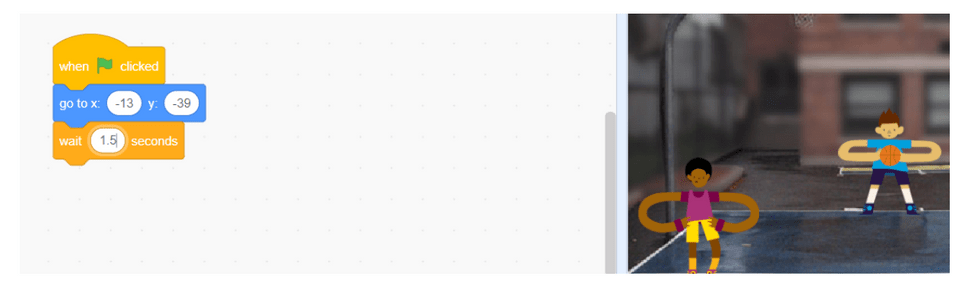
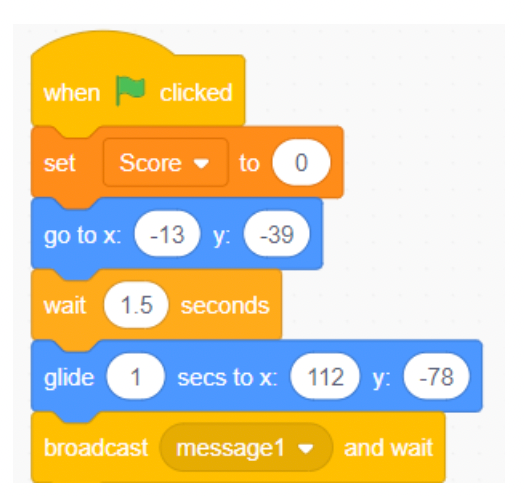
We are ready to code. We will start with the ball sprite but first, click on dorian-a costume, and manually position the ball in Dorian’s hands. Do this by clicking and dragging the basketball where it is supposed to start. Then set the ball’s position (x and y points) to always be there when the green flag is clicked. Use the go to x: _ and y: _ block to do this. We will also need the ball to stay there for about a second and a half before Dorian passes it to Andie. We will use the control block that says wait 1 second to do this. Change it to say 1.5 seconds instead of just 1 second
Step 6: Ball’s next location
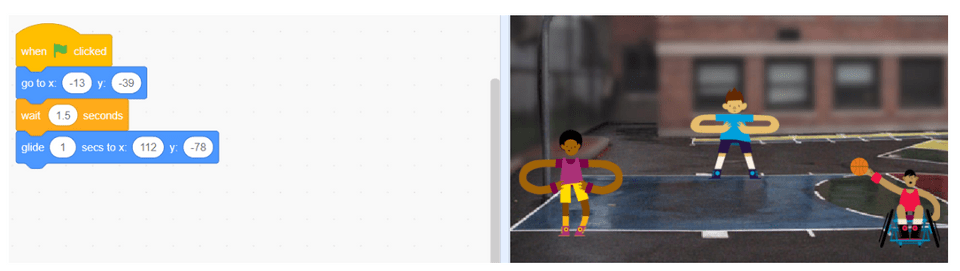
Switch Andie’s costume to andie-a, and manually position the ball to be in his right hand by clicking and dragging the ball. Only then are we ready to program the ball to be passed (glide) from Dorian to Andie. We do this by using the glide _ secs to x: _ y:_ block. If you move the ball before grabbing the code, the x and y values will already match the new position of the ball!
Step 7: Make sprite Andie switch hands
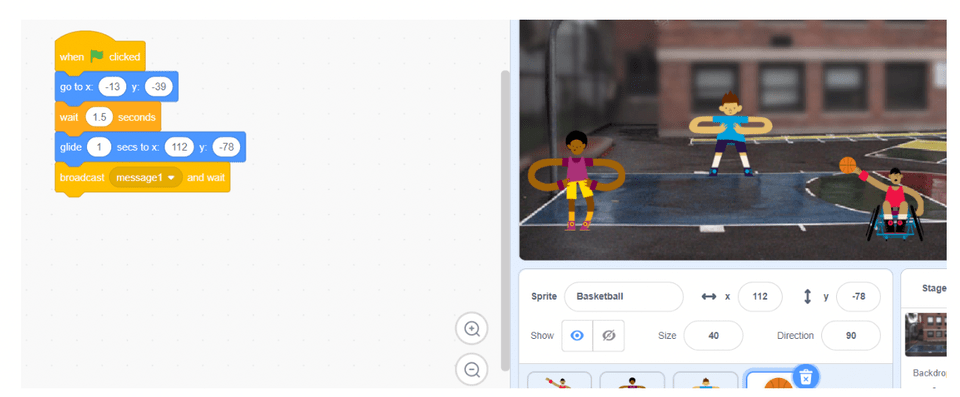
The next step is to have Andie show off his skill by switching the ball from one hand to another. We will use the broadcast message and wait block.
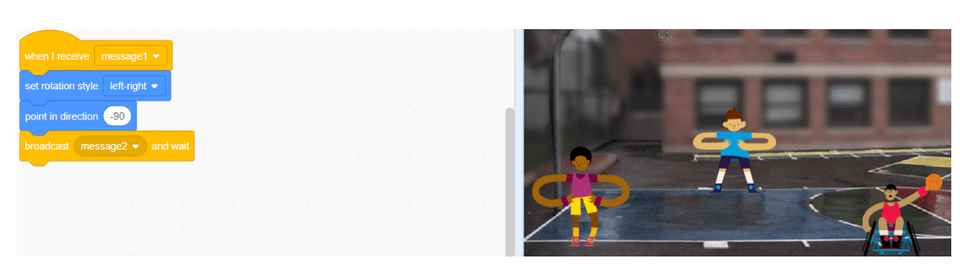
Step 8: Broadcast 1st message
Now we need to program Andie’s sprite to do two things:
- Switch the ball to his left hand
- Pass the ball to Jamal.
This can be done as soon as Andie receives “message1” from the previous step. Furthermore, we will broadcast yet another message (Call it message2), which will trigger the ball to also go from being in Andie’s right hand to being in his left hand.
Step 9: Broadcast 2nd message
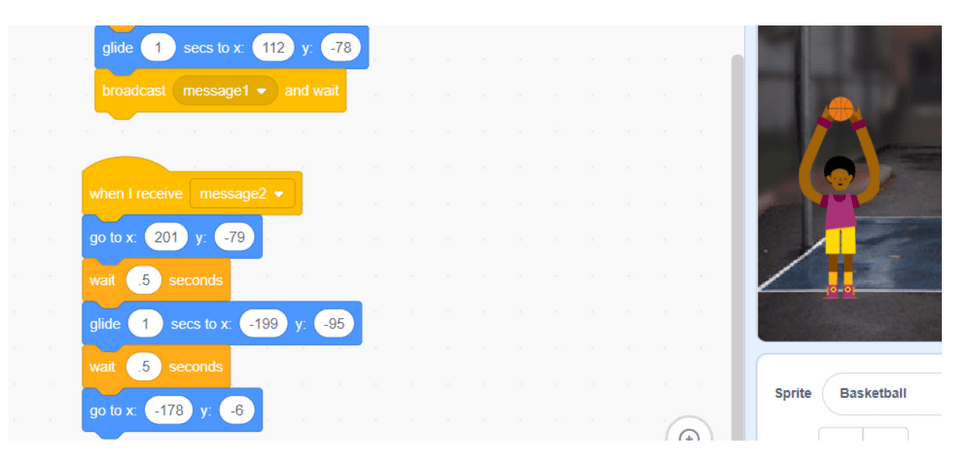
Go ahead and test your game. You will notice that Andie now has his left arm raised. This is what we wanted. Manually move the ball to his hand by clicking and dragging. Then, use the glide _ secs to x:_ y:_ block. Remember, if you move the ball before grabbing the block, it will already have the correct numbers! All there is left to do after at this point is have Andie pass the ball to Jamal.
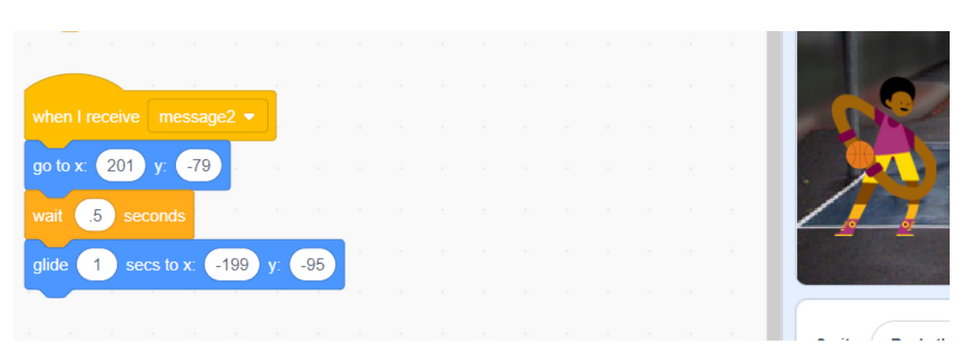
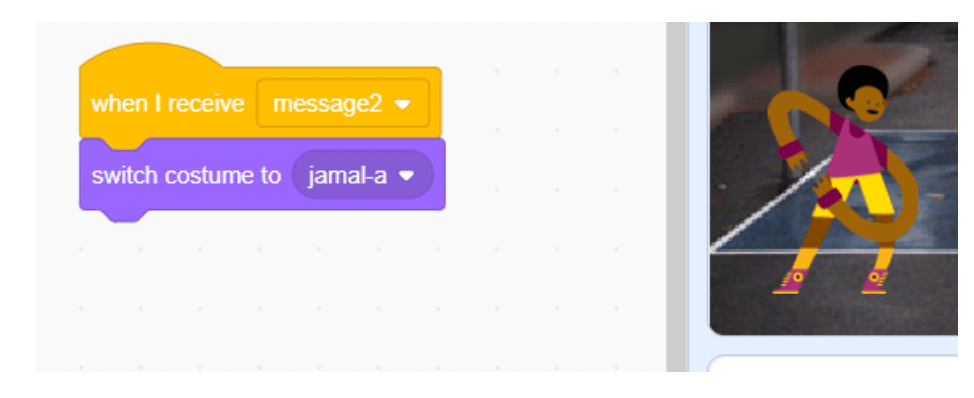
Step 10: Message2 – What to do
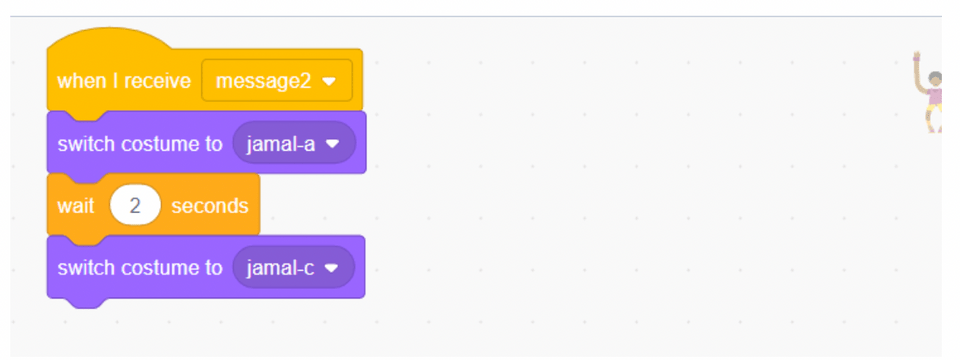
It is time for Jamal to catch the ball. Under Jamal’s customs, select jamal-a so that we can go ahead and position the ball to where his hands are. We will add a .5 second wait time as well as the glide block so that the ball can glide into Jamal’s hands. We also need to prep Jamal for the message2 – he will get into the catching position which is jamal-a custume.
Step 11: Message2, few more steps
Use jamal-c costume for ball throwing, however, edit his arms first. Make his arms appear closer to one another. We did this for Dorian in Step 4. Also, we need Jamal to switch to this costume at the right time, so we’ll add a wait block in between.
Step 12: Prep to score
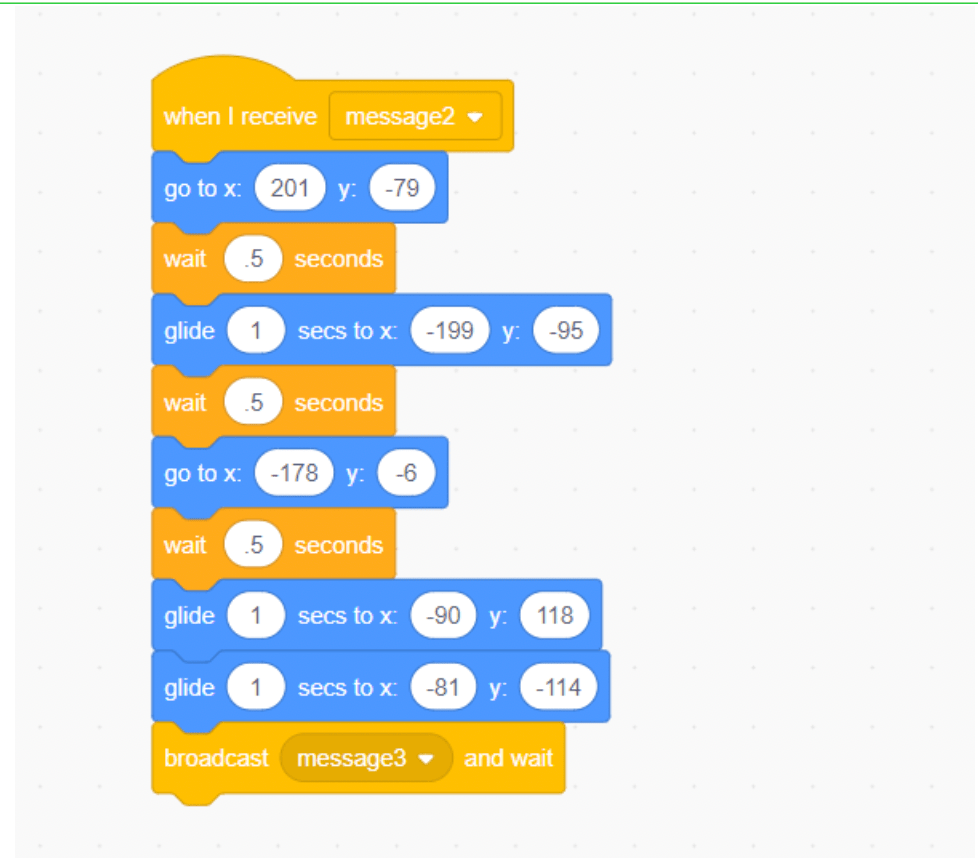
We are once more going to add on to where we left off with the basketball’s coding sequence. In this step, we need to position the ball between Jamal’s hands and add another pause using a wait block, and another “go to” motion block.
Step 13: The scoring steps
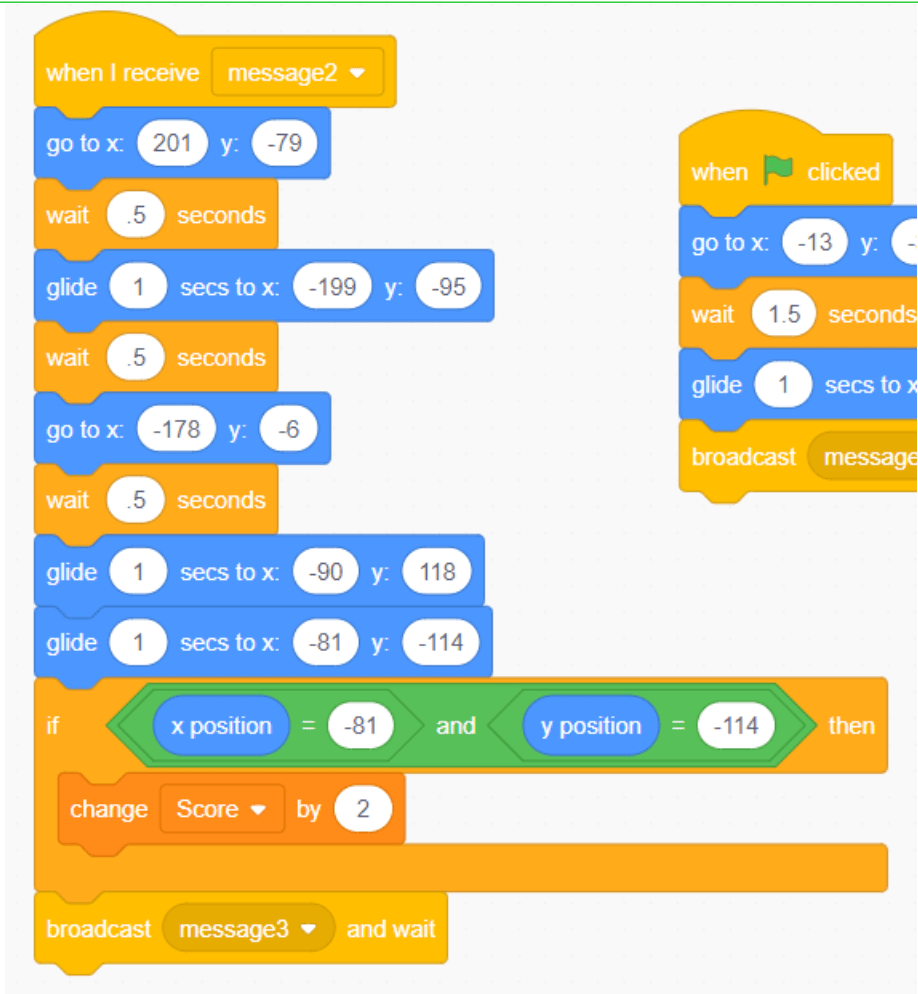
We are not done with the ball just yet but we are at the final steps of the ball’s whereabouts. We need to make it look as Jamal is going for the hoop. Position the ball to the top of the basketball hoop, then add the glide block to the coding sequence. Next, position the ball to the bottom of the hoop, and again add another glide block. At that point, we need to broadcast another message which will trigger all three player sprites to celebrate by throwing their arms in the air and jumping up and down. We will call this message: message3.
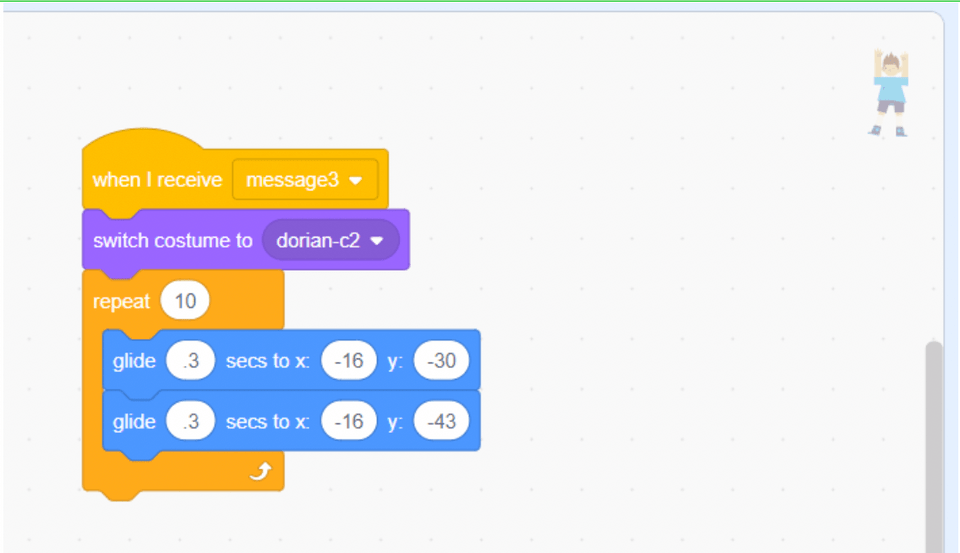
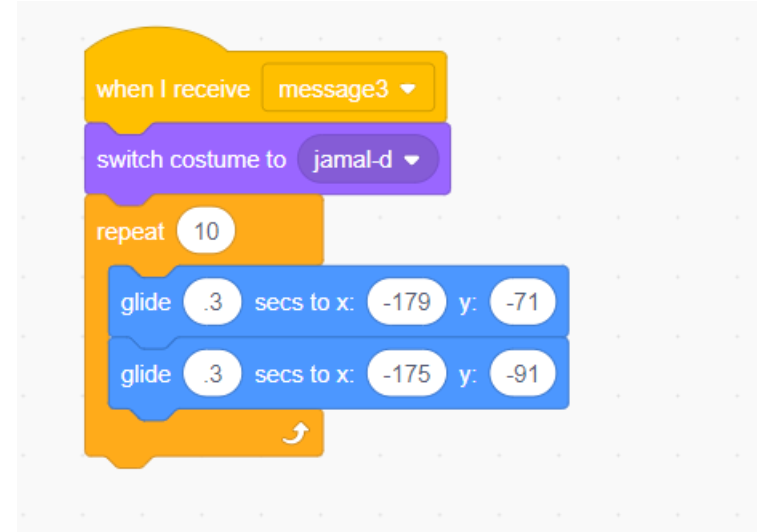
Step 14: Prep to animate excitement
Jamal, Dorian, and Andie will all switch costumes when they receive message3 but we will also animate Jamal and Dorian will appear if they are jumping up and down. For this, we will use the same concept as we did for the ball – we will manually move the sprites up and down to get the x and y positions in our glide block. Again, make sure to move them first then place the glide block so you don’t have to manually enter the x and y positions!
The only thing that should be different is the amount of time the sprites will glide. One second is too long and we want to make the jumping appear a little more realistic. We will repeat this process for 10 times for both Jamal and Dorian. To repeat ten times, use the repeat 10 loop from the control category.
Step 15: Keeping costumes in line
Test your game. What do we notice? It seems as if the last steps of the custom switch stayed there, doesn’t it? Which sort of throws off how our sprites behave when we want to see them pass the ball etc. It just does not seem right. This is an easy fix.
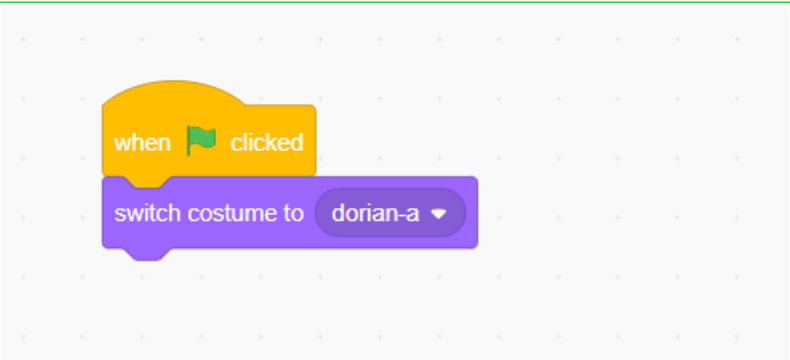
For each sprite we will use the “when the green flag is clicked” to assign their appropriate costumes for a smoother transition.
Step 16: Broadcast 3rd and final message
We need to adjust the costumes as each sprite receives the broadcast message. Do this for all sprites under each broadcasted message.
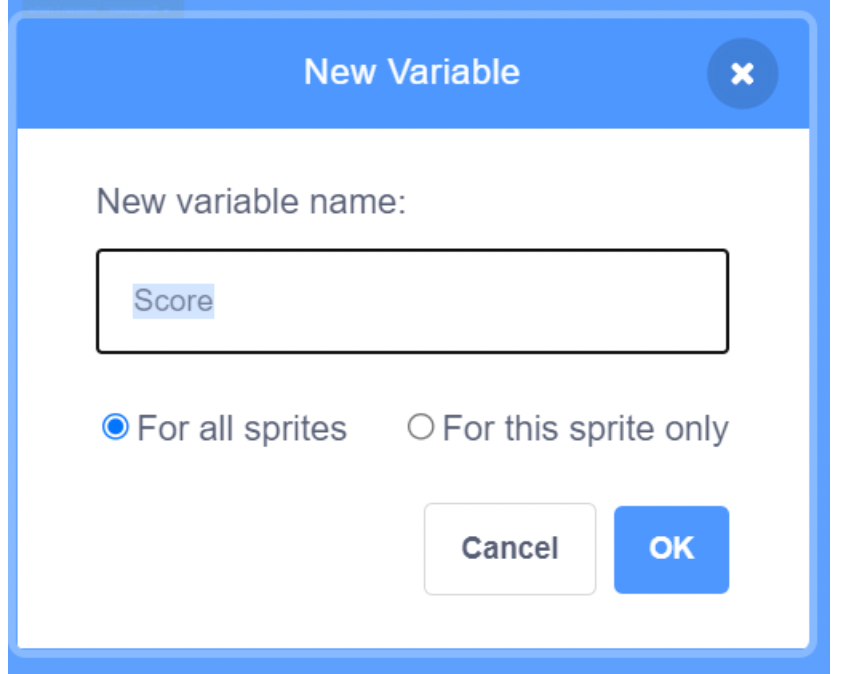
Step 17: Add score variable
All that is missing now is the score of the basketball game. Click on Variables, and then click on Make a Variable. Name it Score and leave the button checked for all sprites.
Step 18: Program score using conditional and math operators
Add two points when the ball lands on the floor. Do this by changing the score variable by 2. This goes in the code sequence after the last “glide” block we used for the basketball. In our case, that was x=-81 and y=-144. Use the if/then conditional block as well as math operation blocks ‘=’ and ‘and’.
Step 19: Reset score
As you test your game, you may have noticed that we keep adding to the score regardless of how many times we start the game over. This is an easy fix. All we need to do is set the score back to zero at the beginning of the game which would be when the green flag is clicked. This is good practice for all variables that you will use in your programs. You should always set the variable amount before using the variable. In this program, you can do this under any sprite but we should stick with the ball since the score is added once the ball is on the ground. At this point, you are all set!
The link to this game can be found here!
Common Issues and Bugs in the Scratch Basketball Game Tutorial and How to Solve Them
Creating a basketball game in Scratch can be exciting, but you might run into some common issues along the way. Here are solutions to help you troubleshoot:
- Sprites Not Resizing Correctly:
- Issue: The sprites (Andie, Jamal, Dorian, and the ball) do not resize as expected.
- Solution: Ensure you manually set the size of each sprite correctly in the Scratch editor. Click on each sprite, go to the “Size” field, and enter 70% for the player sprites and 40% for the ball. Double-check that you have selected the correct sprites.
- Ball Sprite Not Positioned Correctly:
- Issue: The ball does not start in Dorian’s hands or doesn’t glide correctly.
- Solution: Make sure you have correctly set the ball’s initial position using the “go to x: y:” block. Manually place the ball in Dorian’s hands and note the x and y coordinates. Use these coordinates in the code to ensure the ball starts in the right place. Also, double-check the glide blocks to ensure they have the correct coordinates for moving the ball.
- Broadcast Messages Not Working:
- Issue: The ball does not pass from one player to another, or the players do not react to broadcast messages.
- Solution: Ensure you have correctly set up the broadcast messages. Each player sprite should have a “when I receive [message]” block with the appropriate actions underneath. Make sure the messages are named consistently (e.g., “message1”, “message2”) and are spelled exactly the same in all blocks.
- Sprites Not Switching Costumes:
- Issue: The player sprites do not switch to the correct costumes when they receive messages.
- Solution: Check that you have the correct costume names in the “switch costume to [costume]” blocks. Make sure each sprite has the necessary costumes and that they are named and selected correctly in the code. You can find the costume names in the Costumes tab of each sprite.
- Animations Not Smooth:
- Issue: The animations, such as passing the ball or jumping, are not smooth or do not look realistic.
- Solution: Adjust the timing of the glide blocks to ensure smooth transitions. You may need to experiment with different wait times and glide durations to get the desired effect. For jumping animations, ensure you are using shorter glide times to make the movements appear more natural.
- Score Not Updating or Resetting:
- Issue: The score does not update correctly when the ball lands or does not reset at the start of the game.
- Solution: Verify that you have added the “change score by 2” block at the correct point in the code (when the ball lands). Ensure you use an “if/then” block with the correct x and y coordinates to detect when the ball hits the ground. To reset the score, use a “set score to 0” block at the start of the game, under the “when green flag clicked” event for the ball sprite.
By following these solutions, you should be able to troubleshoot common issues and ensure your basketball game runs smoothly. Happy coding!
Key Programming Concepts in the Scratch Basketball Game Tutorial
1. Variables
- What Are They?: Variables are like containers that store information that your program can use and manipulate. They can hold numbers, text, or other data types.
- Usage in the Tutorial: In the basketball game, the “score” variable keeps track of the player’s points. Each time the ball goes through the hoop, the score increases.
2. Broadcast Messages
- What Are They?: Broadcast messages are a way to communicate between different sprites and parts of your code. When a message is broadcast, any sprite that has a corresponding “when I receive [message]” block will execute its code.
- Usage in the Tutorial: Broadcast messages are used to coordinate actions between the players and the ball. For example, when Andie passes the ball, a broadcast message triggers the ball to move to Jamal.
3. Events
- What Are They?: Events are actions that trigger certain parts of your code to run. Examples include clicking the green flag to start the game, receiving a broadcast message, or a sprite being clicked.
- Usage in the Tutorial: Events are crucial in the basketball game. The “when green flag clicked” event starts the game and positions the ball. Other events like “when I receive [message]” help manage the ball passing and player animations.
4. Coordinates (x, y)
- What Are They?: Coordinates (x, y) define a position on the Scratch stage. The x-coordinate represents the horizontal position, and the y-coordinate represents the vertical position.
- Usage in the Tutorial: Coordinates are used to position the ball in the players’ hands and to animate the ball’s movement. For example, setting the ball’s initial position in Dorian’s hands involves specifying the x and y coordinates.
5. Costumes
- What Are They?: Costumes are different appearances or states of a sprite. A sprite can switch between costumes to create animations or show different looks.
- Usage in the Tutorial: Costumes are used to animate the players and show different actions, such as Dorian raising his arms or Andie switching hands. By switching costumes at the right time, we create the illusion of movement.
6. Loops
- What Are They?: Loops allow you to repeat a set of instructions multiple times. There are different types of loops, such as “forever” loops that continue indefinitely, and “repeat” loops that run a specific number of times.
- Usage in the Tutorial: Loops are used to make continuous checks or repeated actions, like keeping the ball moving smoothly and making the players jump up and down in celebration.
7. Conditional Statements (If/Then)
- What Are They?: Conditional statements allow your program to make decisions based on certain conditions. If a condition is true, the code inside the “if” block runs.
- Usage in the Tutorial: Conditional statements are used to check whether the ball has reached certain positions, such as when it lands in the hoop, which then triggers the score to increase.
By understanding these key programming concepts, you’ll have a solid foundation to build and enhance your basketball game, making it interactive and fun to play.
Advanced Tips and Enhancements
Taking your basketball game animation to the next level can be both fun and rewarding. Here are some advanced tips and enhancements to make your game even more exciting:
1. Adding Sound Effects and Music
- Why It’s Exciting: Sound effects and music make the game more immersive and engaging.
- How to Do It: Go to the Sounds tab in Scratch to add and edit sounds. You can upload your own sounds or choose from Scratch’s library. Use the “play sound [sound] until done” block to trigger sounds at the right moments.
- Example: Play a cheering sound when a player scores or background music during the game.
2. Incorporating More Complex Animations
- Why It’s Fun: Complex animations make the game visually appealing and dynamic.
- How to Do It: Create more costumes for your sprites to represent different animations, such as dribbling, jumping, or celebrating. Use the “switch costume to [costume]” and “next costume” blocks to animate these actions.
- Example: Animate a dribbling sequence by switching between different dribbling costumes in a loop.
3. Creating Interactive Elements
- Why It’s Engaging: Interactive elements make the game more interactive and fun to play.
- How to Do It: Add buttons or interactive objects that players can click to perform actions, such as starting a new game, pausing, or accessing a help menu. Use the “when this sprite clicked” block to define what happens when these elements are clicked.
- Example: Create a “Start Game” button that resets the score and positions all sprites when clicked.
By incorporating these advanced features, you’ll not only enhance your basketball game animation but also deepen your understanding of programming concepts. Experiment with different ideas, and don’t be afraid to try new things—creativity is key in making your game animation unique and enjoyable!
Make a Basketball Game on Scratch
When it comes to animating your game on Scratch, the goal is to make everything look as “real” or as “alive” as possible. In this tutorial, we gave you an idea of how to do just that.
From editing and switching Sprite customs, to broadcasting and receiving messages, and even selecting precise x and y points for the ball to flock to, we have plenty of tools to make even a simple game seem sophisticated and catchy. All that’s needed is an idea and creativity.
Next, see how to make a clicker game on Scratch or enjoy a free intro to Scratch coding class, designed by experts from Google, Stanford, and MIT.
Written by Sandra Dizdarevic, a Create & Learn instructor with 6 years of experience teaching STEM to children in the 3rd through 11th grade. She has an Undergraduate as well as a Masters Degree in Management Information Systems from UNO.
Game News
Game Center
Game News
Review Film
Rumus Matematika
Anime Batch
Berita Terkini
Berita Terkini
Berita Terkini
Berita Terkini
review anime
Gaming Center
Gaming Center
Gaming center adalah sebuah tempat atau fasilitas yang menyediakan berbagai perangkat dan layanan untuk bermain video game, baik di PC, konsol, maupun mesin arcade. Gaming center ini bisa dikunjungi oleh siapa saja yang ingin bermain game secara individu atau bersama teman-teman. Beberapa gaming center juga sering digunakan sebagai lokasi turnamen game atau esports.